Showing posts with label House Update. Show all posts

Friday, June 15, 2012

A Growth Chart for the Boys


Rowan grows like crazy.  Every day it seems like he's this much closer to grabbing the doorknobs and bonking his head on the counter top...ok, he's already grabbing the doorknobs!

It's time to start tracking this kids height!

Originally, I was going to paint a growth chart, but we can't take that with us when/if we move.  No fun :(  So I kind of put that off...

Then this came up on the Silhouette blog


I hate to be a total copycat, but basically, we copied this project to a "T"....except for a few things:

-We used wood slats from an old Ikea bed instead of pallets.

-We made ours by putting two slats together side-by-side and then another pair on top so that it could be taller....our boys could be tall!

-We started the measurements at 2 feet.  This allowed us to make more room above 6 feet and besides, by the time you measure your kid's height, they'll probably be taller than 2 feet already.  BUT, you have to make sure you mount the chart exactly 2 ft from the floor!

-No need for a fancy-schmancy Silhouette  (: x).  For 3 Bucks, I bought number stencils at The Home Depot.

-For the white portion, we Kilz used primer, which we had on hand.  Worked great.  It's runnier than paint so you can still see the wood grain and it give a very flat, rugged finish.


I like.

Also, not sure how the original one was mounted, but we used two flushmount brackets on each of the two pairs of slats.

Mounting the chart was kind of a challenge.  We measured two feet from the floor and marked where the bottom of the chart had to be.  Then we attached one piece of the flushmount brackets to the back of the boards.  We put tape on the back of the other piece and clipped those into the attached piece.  Placed the boards against the wall and applied pressure until the other piece of the flushmount was taped to the wall.  Then carefully lift and remove the boards, leaving the other piece of the bracket on the wall.  Then drive in the screws!  It's a little tricky and might be easier to just measure it all out.  But that's how we did it.

You'll want a level too, to make sure your chart is straight.


Thursday, April 26, 2012

{DIY} New Lawn & Landscape

After multiple failed attempts to get on HGTV's Curb Appeal, we finally conceded that we were gonna have to get our hands dirty and fix up the front of our place ourselves. 

This is a pretty slow process since we're learning as we go, and, well, with a toddler and a newborn, and all our pets, and full time jobs, we've got a lot on our plate already.  But as slow as it is, it's also very rewarding to see the improvements come to fruition and know that we CAN do this.

If you remember, this was the front view of our property when we bought it. you can't really tell, but we had a single-car, asphalt driveway, which we had replaced last summer, with a double-car stamped concrete driveway with matching path and flowerbed walls {still in love with our new driveway too!}.  See that project HERE.

After {imagine a tree in the open spot in the curb}

 Before

In addition to the driveway, we had new windows put in, and replaced the front fence {necessary since the old fence was so rotted, Domino could break through it}. 

We also dug up the front yard quite a while ago in preparation for a new lawn.  Well, it started with trying to get rid of a few weeds, which turned into digging up the entire yard thanks to years and years of root growth.  And since we weren't quite ready to tackle the lawn project, we had a dirt lawn for almost a year!

It got to the point that a neighbor sent his gardener over to give us a quote on fixing our front yard!! Okay, this neighbor is one of our good friends, but we got the message.

But in reality, we were making progress. 

1. PLANNING THE YARD

I'm no landscaper, but I drew out what I thought would be a nice plan for the front yard.  Rather than just a lawn, I thought we should try a border along the front and side which we'd fill with flower bushes.  I was hoping this would look nice and save us some water {and $$}.

2. SELECTING/INSTALLING  SPRINKLERS

Rogér installed the sprinkler system {100% himself} over the winter.  We had to wait for some rain to soften up the ground, and unfortunately, this was the least rainy winter we've ever had here.  We used Rainbird because they have a good reputation and if you send in the dimensions of your yard, they'll send you back a plan with the parts list and recommended sprinkler head locations.


Since we still had a lot of work to do as far as getting tilling the ground, Rogér put the sprinkler pipes almost a foot deep.  That way, when we tilled, we wouldn't hit the lines.


3. PREPARING THE DIRT
 
After the sprinkler system was in and tested {it worked beautifully with no leaks!}, we tilled a few times to dig up the remaining weed roots.

We had originally planned to put down grass seed, but our dirt was so rocky that we were worried about the seed growing in evenly.  Plus, many of our friends that have put in lawns recommended sod, so we switched the plan to sod.  Of course, reading up on sod, we realized we were gonna have to get rid of all the rocks anyway!  Ugh!

We read that we had to sift the dirt to remove any rocks bigger than 1/2 inch.  Wow, was this painstaking!  We picked up some wire mesh at Home Depot and used some scrap wood to make sifters.  Foot by foot, we shoveled dirt into the sifters and removed the rocks.  We had done about 1/8th of the yard, which took a couple weeks, when a gardener who works on the house across the street saw me shoveling and sifting {9mos preggo} and came over to tell me that we definitely did NOT need to go through all that work.  He said no landscaper would go through all that trouble, and as long as we got out the BIG rocks, we would be fine.

Taking his advice, we moved really quickly through the rest of the dirt. 

We still had to till a few more times to loosen the ground and remove big rocks and weed roots.  Total, we probably tilled about 5 times, although we had to break it up into multiple sessions due to time and weather constraints.

The gardener also recommended that we mix some redwood mulch into the dirt since our ground was clay rich.  We didn't end up doing that, but we did put in some grass fertilizer that was leftover from a friend's lawn.

Next, we raked and leveled the heck out of the dirt, using a borrowed landscape rake and wheelbarrow, until we were happy with the levelness and pitch of the yard. 


Note: you want a level yard, but with a low pitch down towards the street, so the water will run off towards the street.


We also put in the border so we knew where to stop the sod.  Throughout this process, my mom kept saying things like "THEY might ruin our border when THEY install the sod," and "When are THEY going to do the sod?"  Every time, I reminded her that there is no THEY, only US.  Haha.


4. SOD

We ordered our sod from U-Save Rockery.  It actually came from Sacramento, which was fine since our soil is really good soil.  We've heard that if you have temperamental soil, you will have to get local sod.

Once the sod arrived, it only took a few hours for Rogér and his dad to get it laid in.   This was probably the easiest  and the most rewarding part because we actually had a lawn when it was done!


We read that the best way to lay the sod is so the seems in each row are staggered like bricks.


TIP: For filling in the odd shaped edges, Roger found that cutting the sod from the back {dirt side} worked best.  He used a linoleum knife.


                                                                After laying the sod, Rogér and his dad took turns rolling it out. {U-Save provides a free sod roller for a day with your order}.


And voila!  We have a yard!


5. FINISHING TOUCHES

I had picked out a few flowers from a local nursery with the help of my mom, and we quickly added those to the border area.  The flowers are all full sun and hearty plants to minimize our water usage and maintenance.  The plants still need to grow and we'll fill in more as we're ready.

We installed a drip system to water the plants in the border area and adjusted some of the sprinkler heads so that they would hit every inch of the new grass.


For about a week afterwards, I was still surprised every time I looked out the window and saw our nice lawn!  We also got a lot of compliments from all the neighbors, who I'm sure are pleased after worrying that we would bring down the neighborhood forever.

This was truly a DIY project, and we are super proud of it! 


Wednesday, March 21, 2012

COMING SOON: "Built-in" Window Seating

I've always pictured a built-in window seat and bookshelf around our front living room window. 

We thought it should be easy enough to build.  Especially after looking at plans from this website, which I found through Simply Sadie Jane.

While, that does seem easy enough, our time and space in the garage or "woodshop" is very limited. Not to mention that not having a truck makes large amounts of wood material pickup difficult. As we realized that we were never going to get around to a true built-in, we decided we would fake a built-in using some sort of Ikea modular system.

We originally were going to go with the Billy system, and trick it out with our own fancy trim.  But when we got to Ikea, we found the HEMNES system, and felt that the real wood gave it a nicer touch, so even though the measurements were a little off {nothing non-custom quite fits the dimensions of our windows}, we went for it.

We DO have to make some modifications, and they are a little tricky to figure out, so we're taking our time...haha...what don't we take our time with, eh?

Well,  for now, here is a {grainy} photo of the fairly bare window.  I'll post later on the progress and finished result.


Window with one HEMNES bench constructed

Monday, August 8, 2011

Under-Cabinet Lighting

And have under-cabinet lighting!!  Woohoo!

That's something to get excited about!  Since the kitchen is about 90% done, and fully functional, that last 10% just seems to linger. 

But we try to eek in a small project here and there. 

And I guess it makes every task that gets done seem like a major triumph.  Thank goodness we did the majority of the work before Rowan came along!

To get this mini project done, we used:

-Flourescent under-cabinet lights (2)
-Ikea under-cabinet moulding*
-Drill
-Screwdriver
-Chopsaw

We placed the lights as close to the front of the cabinets as possible, as recommended by the lighting manufacturer.

*Tip:  Use caulk to close any gaps in your undercabinet moulding.  Applied to just one side, it blocks the light from shining through!

Saturday, July 16, 2011

Driveway Love {Our New Stamped Concrete Driveway}

Our narrow asphalt driveway {and the HUGE juniper covering three feet of it} became extremely inconvenient when Baby came along.  There was barely enough room to park both our cars anyway, but we got by, cautiously opening the car door and inching our way out, using our best contortionist skills so as not to damage each others vehicles.  Add a baby, infant car seat, and a stroller to the mix and you don't have a pretty picture.  I ended up parking half my car on the grass {and by "grass" I mean assortment of dried weeds}in order to give us some room to move around.

Our house was in desperate need of a new driveway.  We considered pavers....until we got a quote that shot our aspirations to Hell!  Pavers require some serious dollar bills.  So, we "chose" concrete instead.  And to give it a little pizazz, we went with a stamped border and pathways.

We knew we wanted it widened about three feet on both sides, and we knew we wanted the path to the back yard gate widened enough to roll out the garbage and recycle bins {I know, a lot to ask, right?}, and that's about it.  As far as aesthetics of a driveway go, we were pretty clueless, but with the help our our neighbor {WWBD}, and the expertise of the man who did our driveway, we ended up with something we absolutely LOVE!

Preparing the ground

Form setting and rebar

Good thing Rowan supervised the cement pour
Goofing around
Stamping
DONE!
Oops, don't forget the baby feet!
And our name.
It was amazing to watch these guys do their work!  We had to water the drying cement twice a day and stay off of it for two weeks.  And we just got the stamped portion sealed today, to make it look pretty {and protect it}.

WooHoo!  We find ourselves checking it out multiple times a day.  I'd say it's a very satisfying improvement.  an't wait to use it!

Tuesday, July 12, 2011

Rowan's Revolving Art Gallery

Rogér's dad's side of the family has a pretty exhaustive resume of art.  I mean look at his dad's work! Rogér picked up some fairly amazing skills himself, and, {to toot my own horn a little} I'm not too bad with a pen/pencil/paintbrush either, which I totally learned from my queen-of-all-trades mom. 

So I think it's safe to say that artistic genes run in the family.

And we obviously  have a little protogé on our hands.  check out these masterpieces!  Move over Monet, Picasso, and Rembrandt!  I bet 8 other moms didn't bring home anything like these when they picked up their kids from daycare!


Rowan's "Tropical Week" art and "Father's Day" and "Mother's Day" cards, proudly displayed on our wall with Dynamic FRAMES
{nevermind the lack of moulding on our window...it's on our list, okay?}

Okay, but the real point of my post is to talk about these super frames that I bought online at Dynamic FRAMESA little latch on the side opens them up for easy artwork changes.  So, as Rowan brings home new masterpieces, we can do a quick switch-o-change-o, and VOILA! We'll always be able to display his latest and greatest work!


This one would NOT load right!  What the heck?

And did I mention that each frame will store up to 1" of material?!  The back is spring-loaded, so they're perfect for displaying thicker items {like, say, an autographed sports magazine, or a special t-shirt}, OR, you can use it to store the older pages of artwork....just keep putting the new one on top and pushing the rest back!

Can you tell I'm really excited about these frames {maybe more than I should be}?  The mechanisms are actually pretty easy.  And if I think about it, I really shouldn't have had to pay what I paid.  But I'm still glad I did, because they're going to make collecting Rowan's work a breeze!

Saturday, March 5, 2011

The Great {Paint} Debate - Vote Now!

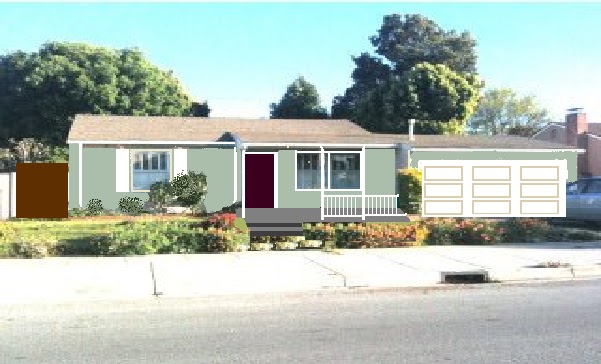
The exterior of our house really needs a fresh look.  We're planning on tackling some curb appeal tasks this summer.  Not the least of those, is a new paint scheme.  But its so hard to decide on colors!  There's plenty of cute houses in the neighborhood to draw inspiration from, but we are running the risk of being copy cats.

We have a hard time committing to colors, so I like to test them out using Microsoft Paint {yea, I'm low-tech like that}.

We've narrowed it down to two options that we like.  I set  up a poll on the left of the blog screen. Let us know what you think through our poll! 


 A

B

  If you're itching to give us another color suggestion, don't hesitate.  We'd love to hear what you think would work!

Tuesday, February 22, 2011

New Dual-Paned Windows for the House

Working on the house has slowed down a LOT snce Rowan was born, but we're getting things done here & there.

We've been thinking about new windows for a while.  Our old windows were the originals, and while I liked them for their character, they were terribly inefficient.  Wtih winter upon us, and a little one to keep warm, we bit the bullet and got ALL windows replaced. 

The new windows are double paned, vinyl, with a UV barrier.  Ideally, I would've liked to have some more time and money to put larger windows in. However, retrofit windows go in super quickly and easily, AND, we didn't need a permit.

Ultimately, we think this update was a great decision.  The new windows look nice, and hopefully, our heating bill won't be as outrageous this month.


Thursday, January 20, 2011

Eff You, Blue Paint!

OH, I am SOOOO frustrated with the paint we are picking for our kitchen/dining areas.

First of all, it took me a long time to decide what colors I liked on the swatch.  Then, it took me a long time to get some real samples to try out. Then, it took me a long time to acutally take the plunge with the real deal.

I chose a dark grey/blue color for the kitchen, behind the oven and fridge.  I started painting away, and fell in LOVE with the color!  Wow.  I was so proud of myself for taking a chance and getting it right!

I did three coats on the whole area and it looked fantastic.  A few hours later, I went to go do some touch-ups.  To my shock and horror, the touch-ups turned out a totally lighter color! WTF!! I must not have mixed the dang paint well enough.  Okay, this might seem like an easy fix, just go get a new can of paint and mix it well, right? WRONG! Because I like the DARK color!  I don't like the color as much if it's all the way mixed.

 Crap. 

Trying to match a mystery wall color doesn't work very well.  We bought a butt-load of new "add a touch of this" samples but none of them are right. 

Today, Rogér mixed two of the sample colors together, and it's surprisingly close.  I think we're going to have to live with it.

Moral of the story:  Mix your paint THOROUGHLY!  Even if you hate the fully mixed color, at least you don't fall in love with a color you can't match.

-Sarah

Saturday, December 11, 2010

My Favorite Corner of the House

Right now, my favorite place in the house is a little corner that hosts a pretty photo of us at our wedding.  Keeps me warm & fuzzy :)


Do you have a favorite spot in your house?

-Sarah

Tuesday, December 7, 2010

House Update - Furnace is Officially Working!

The GOOD NEWS:  The furnace is fixed and Dom, Buds, and I are sitting pretty (and warm) in the house these days.

The BAD NEWS:  The repair cost us 300 George Washingtons!!

The LESSON: A while back, a nice PG&E guy told us (for free) that the furnace probably needed a new ignitor. We chose not to DIY this one, because we had no clue about furnaces and just wanted it fixed already!  We had someone come and test the furnace, and after a $65 half hour diagnostic, he found that the ignitor needed to be replaced....genius.  after watching the guy repair it, we quickly realized this would have been a super simple fix.   The part just plugs into an air switch type thingy.  All you have to do is order a new ignitor and plug the hose into it! Well, the ignitor is not that cheap anyway, but you can certainly get it for less than $240 + $65.

Sunday, December 5, 2010

It's Beginning to Look a Lot Like Christmas

The Balyon House is now ready for Christmas!  We just put up our lights and our tree!


 We have a feeling this is going to be a good Christmas ;)

Friday, December 3, 2010

House Update - Drawer Pulls

Yay!  I put draw pulls on (almost) all the kitchen cabinets.  This is great news because now Rogér has no excuse not to put the counter tops on ;)


Well, okay, he has some good excuses....like riding lessons, or putting up Christmas lights, or organizing the garage.

I guess he's needed a little break after the plumbing got done.  Well deserved, of course!!

Wednesday, December 1, 2010

Winter Has Arrived!

So, like two weeks ago, it was 80 Deg. F, and now it's literally freezing!  Seriously, where was the gradual shift in temperature?

Too bad we put off getting our heater fixed for so long!

Now, we're desperately trying to get someone over to replace the broken igniter, while we all huddle near the space heater.

Domino hogging all the heat....can't say I blame him.

Sunday, November 21, 2010

Quick Weekend Recap

Well...

Ronin is all healed up, Yay!  

Our Dyson Animal is in the repair shop (and it's not even a year old!)

My sore throat turned into a full fledged cold.  

I dropped a pipe on Rogér's face, and he had to go to the Emergency Room for a stitch. 


 We're cooking our first meal in our fully functional kitchen!  

And we found out that Domino is actually not a dog, but a Jedi Ewok. 

Wednesday, October 27, 2010

Groutable Vinyl Tile Flooring - Our Experience So Far


I said I'd share more about our groutable vinyl tile floor, so here it is.

There are sooooo many floor options to choose from.  We were really excited when we this tile at Home Depot because we liked the look without the tile hassle. I looked it up online to see what advice I could find and there were a couple good suggestions. For the rest, we just took our chances.

The whole install was relatively painless.  My mom and I marked the centerlines of the kitchen and then laid out tile (with the backing on) in a square around the kitchen island, we did this to make sure everything was square. That looked good so we got to it, starting with our initial square and then building out.  We tried to avoid doing one long straight line of tiles all at once, in case things got a little crooked, which only happened once.  Once you lay the tiles down you can't really make adjustments like with real tile.  We did have to pull up one or two and re-lay them.  I'm not sure if this will affect the life of the tile.


We used 3/16" tile spacers because we liked the way it looked.

Grouting and floating was a little tricky.  We got pre-mixed, quick dry grout.  Never used it before.  This was much more convenient than mixing yourself. Warning:  It dries quick!!  At first, Rogér and I both grouted and when I went to go float over the tile, the grout was already drying, leaving patches of grout on the tiles and a rough finish in between the tiles.  After that, Rogér grouted and I floated over the grouted tile almost immediately.  This worked really well.  We didn't have problems with the grout not sticking in between the tiles. 
Pros and Cons so far:

Pros:
-Easy install and no need to account for extra thickness of floor like with ceramic and stone tiles
-Quick adhesion and drying
-Easier to cut than stone or ceramic (although, they are thicker than other vinyl tile, so cutting is still a bit of a challenge.  We used garden shears and a box cutter)
-Low cost - Ours was about $1.16/sft
-Looks great, almost like real stone (our baby shower guests had to touch it to tell the difference)
-Seems like it would be easy to replace
-Cleans up easy
-Less sealing (You should still seal the grout, but the tiles don't need it)

Cons:
-Can't adjust tiles once they're laid down
-May have trouble sticking (one of our tiles is lifting at a corner. maybe it got too wet underneath during float?)
-Must prime the floor if you don't have a super smooth subfloor.  Wood will need primer.
-Grout film - everywhere.  Cleans up after a mop or two though (after the grout has set of course).

Helpful tips:
1.  Use two buckets of water (dirty and clean) for the float, and clean the water often.
2.  Float quickly after grouting if using quick-dry grout.
3.  Use a large piece of wood as a cutting surface for the tile, score with the box cutter and fold to snap a clean line.  Use garden shears or heavy duty scissors for cutting more intricate shapes.

That's all I can think of.  We're pretty happy with our new floor :)

Thursday, October 21, 2010

Catch up

I know, it's been a while since we've posted anything.  As I mentioned last time, we're super busy.  Not to mention that I'm exhausted and totally uninspired to write or go through pics to post.  But here's my attempt to get up to date, so that we can start on a fresh note when I get that blogging spark again.

First of all, we've been preparing for our baby shower, which, like I've mentioned before, we decided to have at our own house (yeah, a little ambitious, ya think?).  Anyway, my big requirements for that were the completion of the kitchen floor and base cabinets/countertops, and cleanup of the trophy room and patio.  My mom came down on the Wednesday before the shower so she could help us get the place up to snuff.

We worked our butts off from 7am until 1am each day, but I have to say, the results were pretty incredible!!  We almost got all of our cabinets in (no countertops though).  We also laid our kitchen floor.  We chose to use groutable vinyl tile.  This was really....interesting.  Not too difficult.  Actually, laying the tiles down was easier than I thought.  Grouting was a little tricky.  I'll try to provide some more info in a separate post.

Our appliances came in as well!  They look great!  I don't know how the work cuz we haven't installed them yet.

The shower went really well, but what else did I expect?  When you're surrounded by wonderful, loving friends and family, who cares what your house looks like anyway?  Baby Balyon is set for life! He's probably got enough stylish clothes to wear 10-15 different outfits per day for the first 3 mos!  More on the baby shower later...

Here's some pics to tell the rest of the story:


Hard to believe this all got done in a matter of a a couple weeks. 

Stay tuned for the results!!
Related Posts Plugin for WordPress, Blogger...